Replacing attic insulation is a critical home improvement task that enhances energy efficiency, indoor comfort, and long-term savings. When professionals handle the project, homeowners can expect a structured process that ensures quality results. Understanding what occurs during each stage helps set realistic expectations and makes the experience smoother.
First Inspection and Assessment
Experts start the process of attic insulation replacement with a thorough evaluation of the attic space. Technicians examine the current system for signs of wear, moisture damage, or pest contamination. They also assess the attic’s ventilation and structural integrity. This step allows them to determine the scope of work and identify any underlying issues that must be addressed before installation. A detailed report may be provided to outline findings and proposed actions.
Removal of Old or Damaged Insulation
If the existing insulation is compromised, it must be safely removed. Professionals use protective gear and specialized equipment to extract old material without spreading dust or contaminants into the living areas. The removal process is handled carefully to avoid disturbing wiring, plumbing, or other attic components. Once cleared, debris is disposed of responsibly to maintain a clean and healthy environment.
Air Sealing and Leak Detection
Before installing new insulation, technicians focus on sealing air leaks. Common gaps around ducts, chimneys, and recessed lighting are identified and sealed using caulk or expanding foam. This step is essential for preventing conditioned air from escaping and outside air from entering. Proper sealing also reduces strain on heating and cooling systems, thus contributing to improved performance.
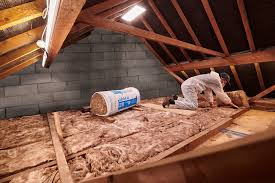
Set-Up of New Insulation Material
Once the attic is clean and properly sealed, new insulation is installed. Professionals choose materials based on climate, budget, and building codes. Options may include fiberglass batts, blown-in cellulose, or spray foam. Each method has its advantages, depending on the structure and the desired R-value. Technicians ensure even coverage and proper depth to meet recommended levels for optimal efficiency.
Proper Ventilation Setup
Ventilation is crucial in maintaining attic performance. Technicians evaluate soffit, ridge, and gable vents to ensure balanced airflow throughout the building. If needed, additional vents are installed to promote air movement and prevent heat buildup. Good ventilation reduces moisture accumulation, protects roofing materials, and extends the life of the insulation system. Continuous airflow helps maintain stable temperatures throughout the year.
Cleanup and Debris Removal
After installation, professionals conduct a full cleanup of the attic and access points. Dust barriers are removed, tools packed, and leftover materials taken away. Technicians ensure the workspace is left tidy and free of construction residue. Homeowners should not expect mess or disruption beyond the duration of the project, as final cleaning is included as part of the service.
Final Quality Check and Recommendations
The final step involves a review of all completed tasks. Technicians verify that insulation meets required standards and confirm that air sealing and ventilation systems function correctly. Some professionals may provide documentation outlining the work performed and offer tips for future maintenance. This step ensures transparency and gives homeowners confidence in the outcome, which reinforces the value of a well-executed upgrade.
A professional attic insulation replacement follows a clear sequence designed to maximize effectiveness and safety. From inspection to final review, each phase contributes to improved home efficiency and comfort. A well-insulated attic helps reduce heating and cooling costs, minimizes temperature fluctuations inside the home, and contributes to a more consistent and comfortable indoor environment year-round.